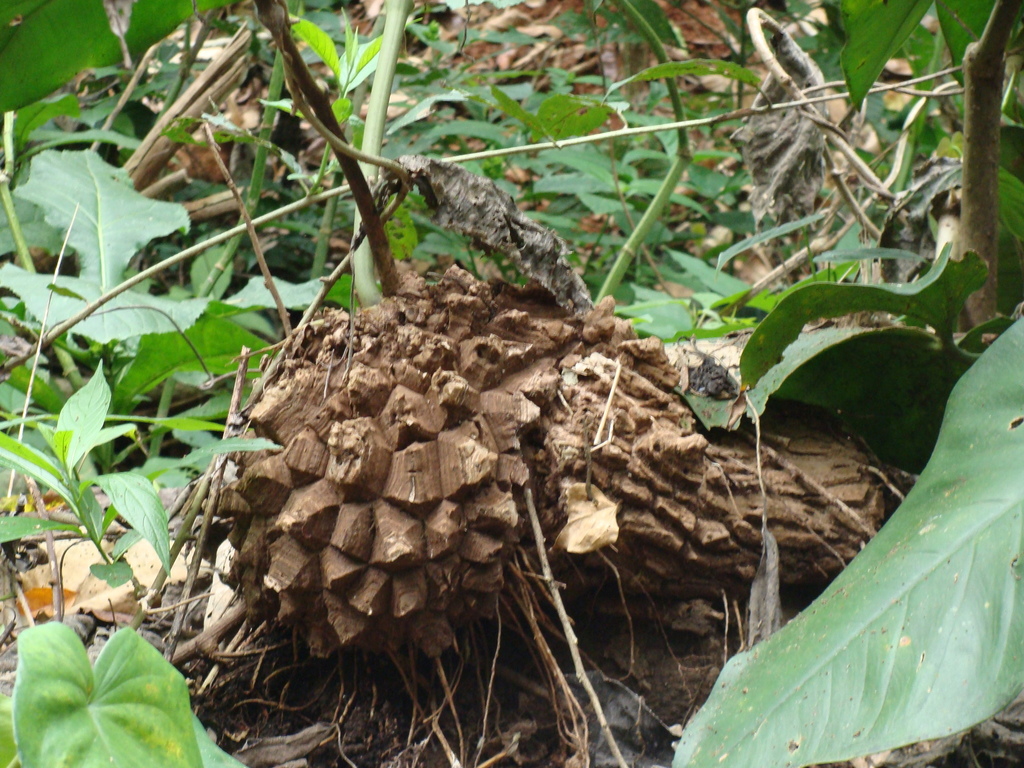
Affectionately known as the "Turtle-back Dragon" (kikkō-ryū) in Japan, this winter-growing caudex plant is native to the dry shrubland of South Africa's Cape Province. The half-buried, dome-shaped caudex cracks into hexagonal plates as it ages, slowly developing the unmistakable tortoise-shell pattern that gives it its name. From autumn through spring, slim vines climb out of the crown and unfurl small heart-shaped leaves; come summer, the top dies back and the plant goes dormant — a rhythm that runs opposite to most plants kept in the Northern Hemisphere. Dioecious and slow to reach flowering size, with a shell pattern that takes years to fully develop, every season of care writes itself into the caudex — which is why it remains the most coveted species among Dioscorea collectors.
Native climate
Rainfall is spread fairly evenly across the year. Overall mild, with a wide temperature range.
A broad-scale picture of the native range. Real growing spots — rock crevices, fog belts — can be milder.
Sources: climate & elevation WorldClim 2.1 (1970–2000) · occurrences GBIF · native range POWO · current weather Open-Meteo
Care
Light & Placement

As a winter grower, the active season is autumn through spring — give it full direct sun outdoors while leaves are out so the vine stays compact and foliage colors up properly. In Japan's summer, the top dies back for dormancy, so park the caudex in bright shade or under a bench, sheltered from rain, while it rests. In winter, place it under a frost-free eave or a bright indoor window, keeping above 3°C.
Watering
Resume watering in autumn when the vine starts extending, then water thoroughly once the surface dries through the autumn-through-spring active season. Bone-dry summer rest in bright shade is the single most important factor for protecting the cracked tortoise-shell pattern.
Substrate
Drainage first, inorganic-led. Akadama : Kanuma : pumice = 4:3:3 is a reliable baseline. Plant with the caudex sitting up out of the soil so the tortoise-shell pattern develops cleanly — a shallower, wider pot suits the silhouette.
Fertilizer & Supplements
A dilute liquid feed once a month through the autumn-through-spring active season, or a small pinch of slow-release at repotting. Nothing during summer dormancy — overfeeding pushes etiolation and root rot in a winter-grower.
Temperature & Overwintering
Reading the winter-grower rhythm is the key skill here. Optimal active-growth range is a cool 10–25°C; when early summer pushes past 25°C and the vine yellows, dormancy is starting. It tolerates down to 3°C but avoid frost and freezing — move indoors on nights below 5°C. Light and water are needed through winter active growth; summer heat plus damp soil is the main rot risk, so dormant plants stay completely dry.

Starting from Seed
Where to source seeds
links go directly to the product page; the rest are scientific-name searches. Stock fluctuates — verify availability on the destination site.
Pre-sowing treatment
Soak seeds for about half a day (overnight) in a mix of a registered seed-treatment fungicide (Benlate or Daconil) and a plant tonic (Menedael; outside Japan, SUPERthrive or a chelated iron / seaweed extract works similarly), each diluted per label. Those still floating are usually past their prime. The thin papery seeds blow away easily, so handle them carefully during soaking. As a winter-grower, germination proceeds at cooler temperatures.
Substrate
Use a separate seedling mix that's fine-grained and near-sterile: fine Akadama, fine Kanuma, and vermiculite in 1:1:1 parts. Sterilizing beforehand with boiling water or a microwave pass meaningfully reduces damping-off losses.
Sowing method
Sow with no covering, or only the thinnest dusting of substrate so the seeds remain partly visible. Space the seeds at least 1 cm apart so they don't clump or overlap on the surface.
Light & temperature
Keep the tray in bright shade at a cool 18–22°C. As a winter-grower, autumn sowing (September–November) lines up with its natural rhythm and produces the best emergence.
Watering
Bottom-water with the level 1–2 cm up the pot. For the first 2–3 weeks, prioritize not letting things dry out, then drop the water level gradually once seedlings are stable.
Fertilizer
No feeding right after germination. Once true leaves emerge, give diluted liquid fertilizer at double dilution once or twice a month through the autumn-through-spring active season.
From Germination to Repotting
Germination through true leaves
Continue bottom watering and keep strong light off them.
Weaning off bottom watering
Phase it out gradually over 1–2 months.
First repotting
In the first or second year, once roots have filled the pot.
Common Pitfalls
Mold & damping-off
- Cause: excess moisture, contamination
- Prevention: sterilize the substrate, ensure good air flow
Etiolation
- Cause: insufficient light
- Prevention: move LEDs closer right after germination, or shift the tray to bright shade outdoors
Seeds fail to germinate
- Cause: stale seeds, insufficient warmth
- Prevention: use fresh seeds and a heat mat
Notes
Summertime heat-and-humidity stress is the single biggest killer. Airflow and shading are essential.